2. Robot operations
Inside
the
hutch

Figure 3. General view of robot control computer (left), MD2 and robot dewar (at right) inside C-hutch.
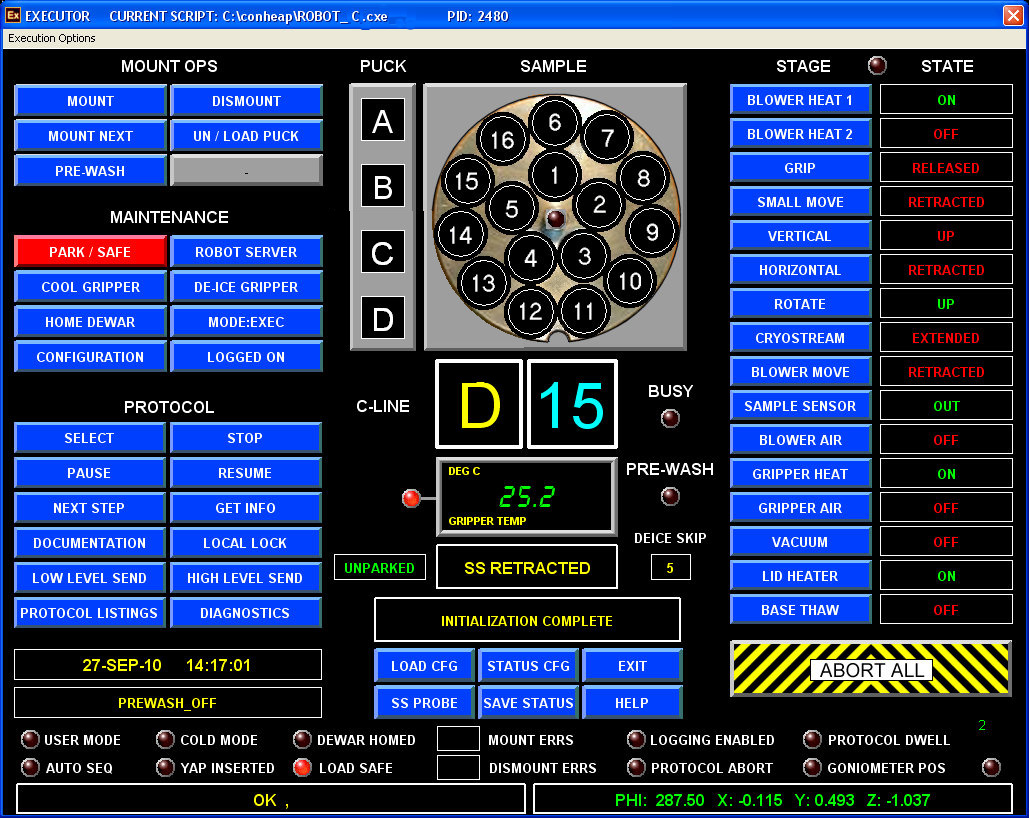
Figure
3B. The main working window for all robotic applications INSIDE the
hutch
Unload/Load Pucks
1. Remove any mounted crystals on
the goniometer, either manually or pressing DISMOUNT button.
2. Click on PARK/SAFE, select "park
gripper" and script will ask you to confirm. Click YES. The robot
script will then perform several sanity checks:
* If MD2 is
not closed, then the capillary/beamstop will be retracted under the
cover.
* Sample on
the Goniomter - The sample sensor will detect if there is a pin on the
goniometer. If a sample is present, the robot script will ask you to
remove the sample or allow the robot to place the sample back in the
dewar. If you choose to manually remove, the sample sensor will retract
to allow you to reach the pin. The sample sensor may be manually moved–
click on “SS PROBE”
Once the spindle is unoccupied, and
all covers are closed, the robot script will park the gripper.
You should wait and NOT touch
anything before the gripper stops in Park Position (facing goniometer).
3. Click UN/LOAD PUCK.
Next a new popup window will appear – select a puck position (A to N)
or CANCEL the operation.
After puck selection, the dewar will
rotate that position directly under the opening and allow for placement
of a puck. There are four positions in the dewar: A, B, C, and D, which
accessible from the inner openning; positions E to N are accessible
from outer openning. Keep
track of which puck goes in which position. After the gripper has been
parked, you can access the dewar.
4. Turn off the lid fan for
better
viewing. Before pucks can
be loaded, the lid must be removed.
5.
Remove the puck from the shipping
cane. Turn over the puck so
that the thick part of the puck is face up. Attach the puck pusher to
the puck. Orient the puck so that the notch is facing the center of
the dewar. Load your puck into the dewar by lowering into the liquid
nitrogen and feeling for engagement of the notch with the pin. It is
recommended to slightly tilt the pusher toward the center of the
dewar. When the puck is engaged, then it will not move in the dewar
and the puck pusher will be perpendicular to the opening of the
dewar. The puck will also be seated inside all three pins. Once the
puck is engaged, push down with the plunger (of the puck pusher) to
separate the two pieces of the puck. Then lift straight up in order
to avoid disturbing the pins. Visually check the alighnment of ALL
pins, use long (and cooled) forceps to place properly tipped over
pins.
7. After loading your puck into the dewar, select
the next position by first clicking UN/LOAD
PUCK, confirm, and then choosing the next position. Due to
the sanity checks, this step is slow. Repeat steps 3-6, until up to
fourteen pucks are in the dewar.
8. Once all your pucks are
loaded, replace the lid on the dewar (make sure the pin on the dewar
is engaged in the lid) and turn the fan back on.
9. You
must cool the gripper before samples can be mounted. Click COOL
GRIPPER. The gripper should enter the dewar and begin
cooling. Once the proper temperature has been achieved, you will be
able to select a puck (click A to N) and a sample (click a
number in the puck picture). Now, sample mounting can proceed. It is
recommended to mount the first crystal inside the hutch, to check
proper alignment of the robot. Once PuckID and Sample# changed color
to yellow/cyan – press “MOUNT”
button and watch the robot mounting the first crystal.
Now all robot operation should be done OUTSIDE the hutch, using the robot script running on auxiliary computer.
Outside the Hutch
All robot operation can done OUTSIDE
the hutch, using the
XTAL CENTERING tab
To mount/unmount samples:
1. To mount your first sample click
the Puck ID (A to N), then click the Sample ID (#1-16). The
Puck ID and Sample ID colors will change to red as the robot moves to
the sample location. When the dewar move is complete, the Puck ID
color will change to yellow and the Sample ID will change to cyan.
Make sure that the BUSY light is green (not bright red),
ROBOT READY and the status is
DISMOUNTED
2. Then click MOUNT under Mount
Ops. The robot will start
mount the selected
crystal;
Be
Patient – it takes ~50 seconds to finish!
When the sample
has been mounted, the voice will state, "Ready to Align Sample."
At this time, you may align/center your crystal. The robot is still
busy doing first de-icing of the gripper and second cooling it.
Please do not click anything in the robot window at this time
3.
Mount Next Sample. With a sample mounted on the goniometer, you have
two choices.
* If you wish to
go to the
very next sample in the puck, then click MOUNT
NEXT. The robot will dismount
the sample and mount the
next sequential sample. When it is complete, the voice will state,
"Ready to Align Sample." Be patient – it takes ~115
seconds for this step.
* If you wish to
go to new sample in the same puck, then click the Puck ID and then
select Sample ID of the desired sample. The puck IDs will change to
red, then back to yellow and Sample ID will change to cyan when your
selection has been accepted. The robot will dismount the current
sample and automatically mount the chosen sample. When the mount is
complete, the voice will state, "Ready to Align Sample." Be
patient – it takes ~125 seconds for this step.
* If you wish to mount a crystal from a different puck, it is
recommended to first click DISMOUNT before selecting your new sample.
The robot will return the currently mounted sample to the puck. Once
the crystal is dismounted, the BUSY light is green (not bright red),
ROBOT READY, click the Puck ID
and then select Sample ID of the desired sample. The puck IDs will
change to red, then back to yellow and Sample ID will change to cyan,
then your selection has been accepted. The robot will move to the new
location and automatically mount the chosen sample. Be Patient – it
takes ~70 seconds to finish! The voice will then state, "Ready
to Align Sample."
* The above
behavior may be changed by checking “Automount Disabled”: in the
Maintenance submenu – the crystal will
be NOT automatically mounted after new selection. You need to click
MOUNT to mount the selected
crystal.
4. Dismount -This command returns
the
currently mounted sample to the puck. (duration ~80 sec)
5. OPTIONS button will give you the menu with different washing scenarios. The most commonly used are:
POST_WASH to wash the crystal after mounting : it instruct the robot to move the crystal back to the dewar, move it back and forth to remove any ice on the loop surface and mount it back.
WASHING MACHINE – The whole dewar is strongly agitated several times to remove ice from many crystals at once; it is recommended to perform this operation after loading your pucks
ENABLE PRE_WASH – Before mounting every new crystal, the gripper will be agitating up and down with every crystal before mounting.
6. If a long time has passed between
sample mounts (such as the
duration of a long data collection), De-Ice
Gripper and then Cool Gripper
prior to dis-mounting. Ice builds up on the gripper during long
intervals and will enter the storage dewar if not removed by
de-icing. Ice in the storage dewar is drawn to any crystals
present.
7. To move the gripper into a safe state for
maintenance (or after finishing the experoment) - click SAFE
GRIPPER.
Aborting
/
Restarting
Robot
Operations
1. If one of the stages is UNDEFINED or there is some form
of
mechanical emergency with the robot, you can stop the Robot by clicking
ABORT ALL (inside the hutch). If the ABORT ALL
button is used during
regular operation, it will cause the Robot to cease, the PROTOCOL ABORT
light will illuminate and further action will not be possible until the
abort has been cleared. Improper clearing of the abort can cause random
robot actions and sample loss. If a physical obstruction is the cause
of the UNDEFINED
state, the obstruction must first be removed prior to
clearing the state. The UNDEFINED state can be cleared by clicking the
stage motion (inside the hutch in the superuser mode ), so that the
state return to normal. To clear the abort,
you must exit the script and restart.
2. If you cannot exit from the Robot
script by pressing EXIT, you
can
abort the script by clicking on Execution Options under the title bar
and then selecting Abort Script.
3. To restart the Robot software
double click the EXEC_Intel icon on the desktop . Click on File
and choose “Prior .CXE Selection”, drag the mouse to the right to
select the script “C:\CONHEAP\ROBOT_C.CXE”. Click on “Execution
Option”
and choose “Execute Script”. Now you should see the new robot window
coming (Figure 3B). After initialization of
the script (be patient),
the robot is ready.
4. The Robot Server should be only
be restarted inside the hutch. If
the Robot Server has been restarted, the socket connections on the
outside beamline computer must be re-established. On the beamline
auxilliary computer, click the ROBOT
SERVER button under Maintenance tab
menu. You will be asked to confirm. Click YES.
General notes for robot trouble-free operations:
Note1:
The robot is
SLOW
– You can’t make it faster: every operation is a set of many
instructions and sanity checks, which should be completed before the
software can accept a new command. Please be patient, and wait every
instruction to be properly finished. Aborting, canceling or just
double-clicking may push the system in the delirious state with long
recovery time.
Note 2: Please
always watch the status of the robot system: When
the robot is ready for the new operation/command it will display
green ROBOT READY status.
Note 3. Double
check the video feed on the computer screen above for robot gripper
position (it should NOT be protruding into MD2) BEFORE “unlocking”
the MD2 computer.
Note 4: Please follow ALL
instructions from your support personnel. Any deviations or shortcuts
are dangerous and will lead to unpredictable results and/or physical
damage of the equipment.