1. How to start beamline control software
General Computer Layout
Our computer network can be roughly separated into five parts: (1) ADSC data collection computers, (2) MD2 operation computer, (3) two computers for the beamline control, (4) three computers for data processing and structure solution and (5) data storage and backup. You should use computers in category (1), (2) or (3) ONLY for data collection and the beamline controls (no Web browsing, games, music etc). In addition, there are two more shared computers in the back user area.

Figure 1, General view of the
main working area on 24 ID-C.
The beamline control software runs on two different Windows computers, namely "master" and "auxilliary". The video from these computers is output to 3 rightmost LCD monitors (see picture above). You can switch between these computers by pressing <ctrl> button twice.
Starting the Master beam line control script
First press <ctrl> button twice and choose MASTER. If the beam line control software is not running, find on the desktop the following icon labeled EXEC_Intel (it may be also called EXECUTOR):
![]()
Note After rebooting the rightmost computer (MASTER) double-click on
the icon called "start_system", which will start all necessary
programs. Drag to the right monitor "DT_server" window and CONSOLE
window (like on the figure 2) ; leave alone other windows (Console
Serial Port Server and Console SAPI Server). The rebooting of the
master computer should be done ONLY after authorization of your support
personnel; many problems may be resolved by simply restarting the
EXEC_Intel script.
and double click on it. You should see a window appear. Make sure
that the current script shown on the titlebar is
C:\CONHEAP\KOHZUU.CXE. Check "clear
cons server flag" under "File"
menu; confirm it in the pop-up window. Click on "Execution Option"
and choose "execute script". This will start the monochormator master
control (see Figure 2 below). This has to be running all time during
your data collection. If you ever need to restart this, you also need
to restart all EXECUTOR scripts on auxiliary
computer (see below), on the computer inside the experimental hutch and
ADSC data collection software. The DT_server window should be fully
visible, as it
will be used while doing the EXAFS scans (explained later). These two
windows should be placed on the most rightmost monitor (as on Figure 2).

Figure 2. View of the MASTER computer (All digits in the DT server
window should NOT be covered by any window)
Starting the MD2 support table and the robot control scripts on the auxiliary computer
Now, press <ctrl>
button twice and choose AUXILLARY. In the top portion of the Desktop
![]() double click the EXEC_Intel (or it may be
called EXECUTOR) icon.
double click the EXEC_Intel (or it may be
called EXECUTOR) icon.
A new window will appear –see figure 3 below.
Click on File
and choose "Prior .CXE Selection",
drag the mouse to the right to select the script
"C:\CONHEAP\PHI_MD2_NEW2.CXE". All
other scripts are for exclusive use of the beamline personnel.
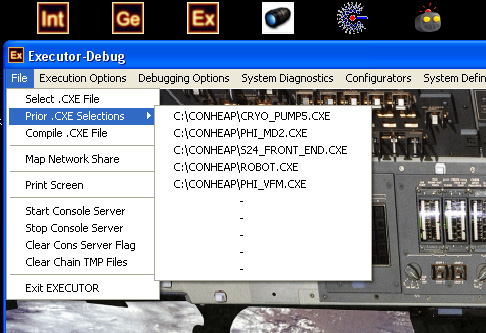
Figure 3. Selecting the script to run
MD2 support table and the robot applications
Click on "Execution Option" and choose "Execute Script" – figure 4
below.

Figure 4.
Suppose you have chosen "C:\CONHEAP\ PHI_MD2_NEW2.CXE" - now you should see the new window coming (Figure 5). If you are planning to use the robot, press "ROBOT" tab.

This is your MAIN working area and you can do all following functions:
- Access the robot control script by pressing ROBOT (see next chapter)
- adjust the orientation of the MD2 table relative to the beam (either manually or AUTOALIGN)
- change the size of the beam aperture (MD2 APPERTURE); check he current aperture value
- change energy and run EXAFS and CHOOCH (see details below Chapter 3 and 6),
- maximize the flux and optimize the beam position ( TRIM_X and TRIM_Y POSITIONs);
- move in/out the sample sensor RETRACT/INSERT SS;
- retract/insert the cold-steam nose RETRACT/INSERT CRYO;
- recover from MD2 hardware error RESET MD2
FAULT
(only after authorization from your support personnel)
- open/close sample shutter; check the status of the main shutter; get APS ring status
- change the beam intensity by changing attenuators; define the
desired beam flux (TRANSMISSION
button)
- check the current values of the energy, flux (arbitrary units), transmission ( in % of the full beam), detector distance, ADSC state and the status of the beamline software (busy/ready)
- access several functions of the script running on the MASTER computer (MASTER OPS)
- change cold stream parameters (be very careful! ) (CRYOJET button)
- read several parameters (to communicate with you support personnel, if requested)
- save or recover the tune state of the beamline , or the current state of the MD2 table
- Access all MD2 functions (centering, beam location/alignments,
etc), ADSC data collections ( including protocols for crystal rastering
and diffraction-based centering) – see here.
In case of emergency, the button "ABORT ALL" stops all MD2 table motors.
Computer layout inside the hutch
Inside the experimental hutch there are two computers, connected to
one monitor: use "Shift" and the button shown on the Figure 6 by yellow
arrow to
switch between MD2 operation computer and beamline control computer,
which is running a robotic application
script. User should only operate one computer at a time:
either inside or outside the hutch.

Figure 6. Computer layout inside the hutch
Prior to launching the robot script, make sure that "Serial Port Server" and "Robot Remote Server" are running in the background (on the taskbar), re-run them if necessary.
Note : The "Robot Remote Server" script should be re-started daily by
your support personel.
See Chapter 3 on how to start the robot
software.
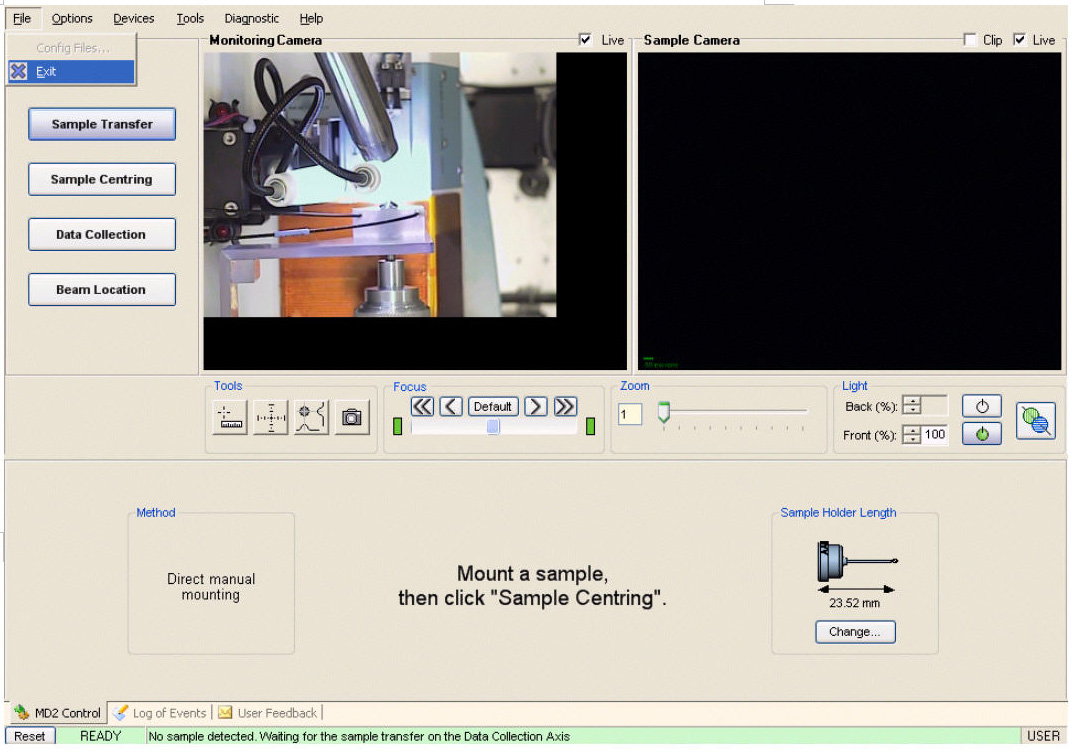
Starting the MD2 diffractometer software on the MD2-operation computer
-
Before starting/restarting MD2 Software, exit
ADSC control system.
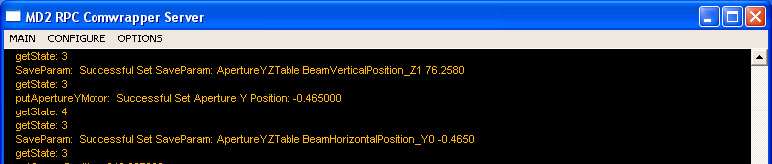
Make sure that MD2_RPC_comwrapper server is not running on MD2 control computer and halt it, if it’s running.
-
Exit from MD2 control system (Menu-File -> Exit), wait until
the window disappears.
-
Restart MD2 control system, by double clicking on the icon
"MD2_Control_GUI_NECAT2",
-
Wait until MD2 system is running (2-3 minutes) and MD2_RPC_comwrapper
window pop-ups;
minimize MD2_RPC_comwrapper window to the taskbar.
If the MD2_RPC_comwrapper does not start automatically after one minute, start the MD2_RPC_comwrapper server manually by clicking on the icon comwrapper_server (this window should be minimized to the taskbar).
Restart ADSC control system.( Data Collection)
md2_comwrapper_server should have a black blank window, if it is white, or doesn't have a top menu bar with "MAIN CONFIGURE OPTIONS" (see figure above) – kill it and restart.
Check Troubleshooting section on how to restart the whole MD-2 and how to restart ALL user beamline control software.
ATTENTIION: Users are forbidden to reboot any beamline computers, unless explicitly authorized by the support personnel.
General notes for trouble-free operations:
Note1: Please always watch the status of the control system: When the system is busy doing something the indicator in the middle on the left side will say so (red button and SYSTEM BUSY), don’t do anything until the system tells you SYSTEM READY. It is normal for the software to display SYSTEM BUSY for a couple seconds at anytime.Note 2: Do NOT open the hutch door or close the main shutter, if the system is changing energy or collecting EXAFS scan or doing the autoalignment or collecting diffraction data. This may results in the mechanical damage to MD2. Besides, the beam may be lost because the system will try to optimize zero level flux and will move the mirrors to the wrong positions: Check the troubleshooting section how to recover the lost flux
Note 3: Only ONE user operation is permitted at a time; i.e. don’t try to align the sample when changing energy , etc.
Also crystal alignment should be done only at one computer: either inside or outside the hutch
Note 4: The system responds to the location and time where and when the mouse is released , so be careful NOT to drag the mouse during the "mouse click". Please also avoid double-clicking.
Note 5. Please follow ALL instructions from your support personnel. Any deviations or shortcuts are dangerous and will lead to unpredictable results and/or physical damage of the equipment.
Note 6. During the non-business hours, if there is any problem, first check the troubleshooting section of this manual, before calling your support personnel