At Home Institution
Unipuck Loading
There is an excellent tutorial on loading samples into unipucks available on the web. This tutorial can also be applied to loading pins into ALS pucks. The same powerpoint presentation on Unipuck Loading is available from SSRL and the University of Melbourne
ALS-Style Puck Loading
Required items:
- Magnetic Wand (HR4-729 from Hampton Research shown in photos)
- Puck Separator Tool
- Puck (Base and Lid)
- Low Form Table Top Dewar
- Tall Form Table Top Dewar
- Complete 18mm Pin (with Loop and attached to Robot-appropriate base)
- Puck Shipping Cane and Hook
- Puck Cryotongs
- Base Holder (optional)
- Puck Stability Washer (optional)
(Click on an image to enlarge. Liquid nitrogen omitted in some images for clarity.)
- All bases must be dry prior to loading. Ice on the base will increase sample changing time due to sample shift when the ice melts.
- Split an empty puck using the puck pusher. Else, if the puck contains samples, split the puck using the puck separator tool.

- Put a puck base, wells up, into one of the low form table top dewars. We recommend using the foam dewars from Spear Labs for increased puck stablity.

Optional - For increase stability, you can use the metal washer provided in the NE-CAT Puck Shipping Kit to support the puck base.- Place the washer in the low form table top dewar.

- Place a puck base, wells up, on top of the washer.

- Place the washer in the low form table top dewar.
- Fill dewar with liquid nitrogen, and wait for the boil off to stop. Cool the puck cane in a tall table top dewar.
- Secure a complete 18mm pin onto the end of a magnetic wand and scoop out one crystal. Quickly plunge the crystal into the liquid nitrogen.

- Wait for the boil off to stop and place the crystal in an empty puck slot. Release the crystal by pressing on the plunger.
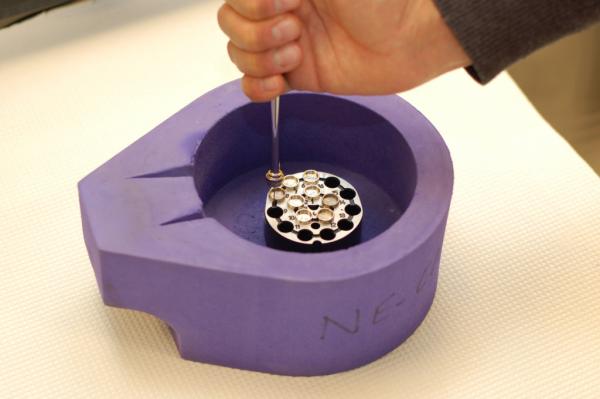
- Keep careful track of which crystal is placed in which well. The caps well in a magnetic lid are numbered as shown. The numbering is consistent with the engravings in the pucks. Note the position of slot 1 and slot 6. When loading the puck, remember to correctly identify these two slots, then proceed counterclockwise until there are no more slots.


- Secure the puck lid onto the puck wand and dip the lid into the dewar to chill.


- To attach the lid, first align the half-round of the lid with the half-round hole of the puck. Push the lid firmly into position. You should feel a "click" when the lid snaps into place. If you are using the puck support base, this will need to be removed prior to attaching the lid.

- With the hook, lift the puck cane out of the tall table top dewar. Remove safety rod. Match hole for safety rod in puck with hole in puck cane. Align the groove at the back of the puck to the back side of the puck cane. Insert the complete puck assembly using the puck cryotongs.

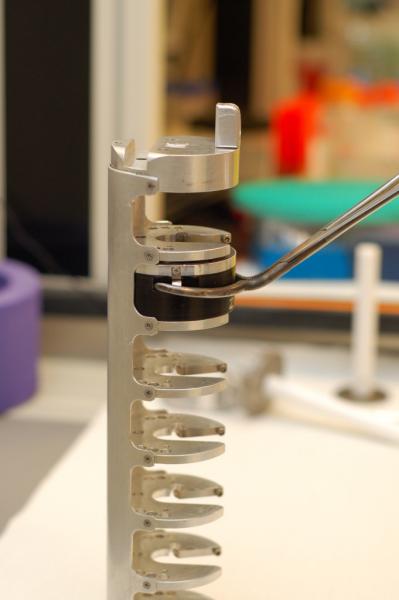
- The puck should go in with the lid facing up. Note that the puck will fit in the cane in either orientation, but only six pucks can be accomodated in the cane if the lid faces down!
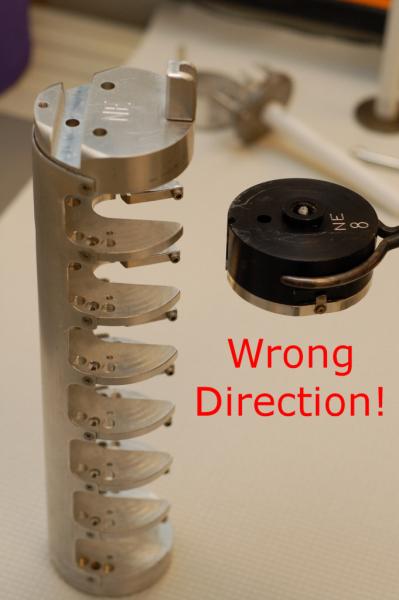
- Repeat until all pucks are filled. Secure the pucks in place by inserting the safety rod. If the safety rod does not slide in easily, it is usually because one or more pucks are not snuggly inserted into the cane (although ice blockage in the pin channel can also cause this). If only six pucks appear to fit in the shipping cane, the pucks have all been inserted with the puck lid facing down. The puck lid should face up!


